A compilation by Dr. Sandesh Doshi (A recreational athlete, Eye specialist and Vitreo-Retinal surgeon. M: 9822031839. E-mail: sandeshdoshi@hotmail.com )
Freestyle Swimming and Triathlon: Tips and Pearls of Wisdom
PREFACE: Learning freestyle swimming was in my mind since my Olympic distance triathlon using breast-stroke (Feb. 2015 @Pune Triathlon) as I was the last person to get out of the water. I covered up for the lost time later in cycling and running segment, to finish in a decent 03:28hrs. I could not do much about learning freestyle swimming in last 1.5 yrs. due to logistical reasons.
My idea of learning freestyle however recently got rejuvenated after my residential society had our own pool in July 2016. Around same time I had a small accident while returning from my weekly Sinhagad Bike and Hike which put me out of action for 3 weeks. Upset with my cycle accident, I decided to change my focus to swimming and I joined the pool. As I started collecting information from internet as well as from friends, I realized that there is lot to learn and it is worth sharing to other friends who are as novice to swimming as I am. The compilation started with learning freestyle but ended with tips for people aspiring for half or full Ironman. 70.3 is called half Ironman and 140.6 is called full Ironman.
Disclaimer: I do not have any financial interest. This compilation is free for circulation. The tips given here are basically personal communications and should be treated like that and viewed as ‘general guidelines’ rather than ‘official recommendations’. The reader has to find out what is applicable to him and improve further. This compilation does not claim scientific correctness of the tips given in this compilation. However to improve this compilation further, I will only be too happy to accept any corrections, improvements and suggestions.
FREESTYLE SWIMMING BASICS:
Freestyle was traditionally a race that allowed competitors to swim in whichever way they wanted. However, after what was referred to as the ‘front crawl’ became the dominant way to freestyle, the term freestyle has replaced the term front crawl as the name for the stroke.
One full cycle (from entry to re-entry) of one arm is known as 1 stroke.
Freestyle involves alternating arms that make windmill arc motions forward while the head is underwater, and the swimmer breathes at the side. It is accompanied by a two or six beat flutter kick that is synced with arm strokes to stabilize the body.
Wiki-How link: http://www.wikihow.com/Swim-Freestyle
Streamline position: Body position with arms extended above the head. One hand is placed over the other and the arms cover the ears. The back and legs are kept straight, until a flutter kick is used.
THE FREESTYLE ARM PULL:
- ENTRY: Hand drives forward into the water at shoulder width. The fingertips enter the water first, with the elbow above the hand and the hand pitched at around 30 degrees. The arm should be approximately 2/3 extended when hand enters the water and then stretches forward. The front arm should be near complete extension as the other arm finishes the underwater pull.
Common errors on entry:
1. Hand in a prone position on entry – increases resistance as the back of the hand pushes against the water.
2. Hand at 90 degrees on entry – increase the possibility of shoulder injury
3. Overreaching – increase drag force on body from lateral movement
4. Entering too early – increases drag, as your hand must travel a further distance under water against the body’s momentum. Read more at: http://swimming.about.com/od/freeandback/qt/Freestyle-Swimming-Hand-Entry-Position.htm
CATCH: Elbow bends and forearm becomes vertical. The catch is made with the front hand as the other hand releases the water. The wrist is flexed outward, downward and backward to expose the palm to the water. The elbow begins to flex, as the hand is swept downward and slightly outward. It is important for swimmers to get a strong catch on the water and maintain a high elbow position as the hand moves under the head and shoulders. Read more at: http://triathlon.competitor.com/2014/08/training/4-phases-freestyle-swim-stroke_103439
POWER PHASE / PULL: Arm presses through the water pushing water backwards. The hand continues to sweep down and in, toward the midline and then upward and in, toward the lower chest. The hand will accelerate slightly throughout the underwater pull to gain maximum speed. Read more at: http://www.triathlete.com/2014/08/training/4-phases-freestyle-swim-stroke_103439
FINISH / EXIT: Hand exits water just past the hip. This is the most under maximized part of the freestyle stroke. Like we do the press-up on the wall to get out of the swimming pool, we must use the wrist flick the water out, as your thumb is hitting your thigh on the way through and give the super powerful acceleration at the side of your body. Read more athttp://triathlon.competitor.com/2014/08/training/4-phases-freestyle-swim-stroke_103439/3
RECOVERY: Arm travels out of the water back overhead. Arm recovery is initiated by lifting the elbow upward and forward. A high elbow recovery is preferred by most because it reduces the effort required and maintains body alignment. The hand and forearm are carried forward in a slight arc (boomerang) around the body with the back of hand pointing forward. A good recovery has a very relaxed, limp hand motion. Common errors in arm recovery:
1. Rushing the recovery – the arm should not start the catch phase until the other arm has finished the stroke. The underwater hand has less distance to travel than the hand recovering.
2. Low lateral recovery – will throw the body out of alignment. Read more at:http://triathlon.competitor.com/2014/08/training/4-phases-freestyle-swim-stroke_103439/4
ARM TIMING: Enter the water with the recovery hand anywhere between the beginning of the upsweep to the beginning of the push back. As one arm pushes back, the recovery arm will have entered and stretched forward in preparation for the catch (out-sweep). The out-sweep will occur simultaneously with the propelling arm’s recovery.
KICKING: The leg kick originates from the hip and the muscles in the upper leg. The legs move primarily in a vertical plane. The key to easy and efficient kicking is to keep ankles and feet loose and flexible. Each kick has an upward and downward component called the upbeat and downbeat. There is also some lateral movement of the legs during the kicking action. This assists with stabilizing and streamlining the body during the stroke.
A six-beat kick requires the swimmer to execute three downward beats during each arm-stroke.
A two-beat kick requires the swimmer to execute one downward beat during each arm-stroke.
Both have their advantages, with the speed provided by a six beat kick worthwhile, while the energy saved by doing a two-beat kick.
BREATHING: Breathing should be incorporated into the body roll. The face should turn to breathe as the opposite hand L enters the water. Inhalation occurs as the hand R pushes back and the recovery takes place. The face is turned back into the water as the recovery arm swings past the face. Unilateral breathing: Breathing from only one side; either right or left. Bilateral breathing: Breathing from both sides, say every 3rdstroke.
Common errors in breathing:
1. Turning the head too early – not able to use natural body roll
2. Dropping the underwater arm through the pull while breathing – creates over roll of body
3. Turning the head out of alignment when breathing – creates too much lateral movement
4. Lifting the head when breathing – hips drop
ROTATION / ROLL: With every stroke, you need to rotate your body along your long axis to minimize the drag. 25 to 35 degrees is ideal rotation. Anything beyond is over rotation. The rolling action of the body enables the swimmer to develop more power by bringing the large trunk muscles into play, particularly in the acceleration at the end of the underwater pull. Body roll will also assist the body to maintain a streamlined position by keeping the hips and shoulders in line. Freestyle swimmers will spend more time on their sides than they do on their fronts.
DRILLS AND CORRECTIVE DRILLS: Drills are the practice drills to learn a particular component of freestyle and corrective drills are to improve it further by correcting the mistakes.
TOTAL IMMERSION VERSUS TRADITIONAL FREESTYLE: Total Immersion is a swimming technique and coaching methodology developed by Terry Laughlin which focuses on 3 skills; balance, streamline and propulsion and creates an integrated whole body movement.
In contrast, the traditional freestyle swimming focuses on 2 independent techniques; kicking and pulling with focus on increasing strength during workouts.
LEARNING FROM ONLINE VIDEOS: There is plenty of online (YouTube and written) material on ‘how to learn freestyle’. Everyone has a ‘different way’ of explaining the ‘same thing’. When learning something new, I have always believed in following a single person. After watching innumerable videos, I selected video series of Chloe Sutton, the two-time Olympic swimmer in both open water and pool, (USA team: Beijing and London) for learning the freestyle.

In my opinion Chloe Sutton’s video series are very recently published and satisfy all my requirements of proper understanding of all the components of freestyle swimming. She has the required clarity of thoughts and gives demonstration accordingly. She explains what is wrong technique with examples and then shows what is the right technique and suggests drills / corrective drills to get them right.
Following (Sr. No. 1-5) are Chloe Sutton’s video series that I have selected. To make it easy for the readers, I have given overview (whatever she has spoken in her videos) of each video along with snapshots of important things that she has highlighted so that next time you want to make a revision; you may not have to see the video again.
Seeing video ‘just once’ does not suffice in my opinion and to assimilate everything that she has said, I think you would need to see every video many times.
There are also few other videos (from Sr. No. 6-10) and stuff that I have selected which highlight other aspects of swimming.
THE FREESTYLE CATCH: https://www.youtube.com/watch?v=T1OY_yQBiXM
Published on Jul 27, 2016. Two-time Olympic swimmer Chloe Sutton explains the most important part of the freestyle arm pull: the catch. Achieving a high elbow catch, allows for maximum power in your freestyle.
Overview: In her opinion the freestyle catch is the most important part of the arm pull, if not the entire stroke. It’s the part of the stroke that separates the good swimmers from the great. Having the ideal high elbow catch can set you apart from the crowd and unlock incredible power in your freestyle. In this video she breaks down the what, why and how of achieving the ideal high elbow catch. Achieving a high elbow catch, allows for maximum power in your freestyle.
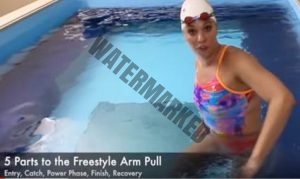
There are 5 types of arm pull:
- Entry,
- Catch,
- Power Phase,
- Finish and
- Recovery.
Objectives of CATCH:
- You must push water backwards: Not sideways, not upwards and not downwards. Palms should always face backwards so that all the energy will propel us forwards.

- Maximize the surface area: Press your whole arm in to water right from your palm, forearm and inside of the upper arm
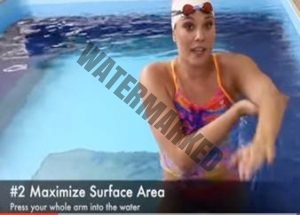
3.Use big muscles: You must engage and pull with your stronger muscles. (lateral, chest, core and shoulder muscles).

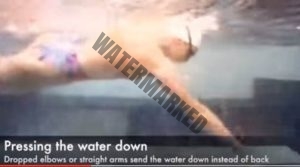
CATCH: Common mistakes
Dropped elbows or straight arms send water down instead of back.
Incorrect S shaped pull sweeping water out and in.

Downward trajectory on entry: Missing a lot of water at the beginning of the pull. It is super important to reach forward on the surface of the water to maximize the effectiveness of high elbow catch.

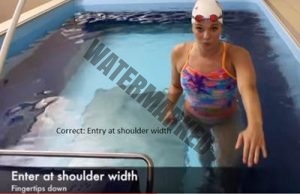
How to get a good catch?
Enter at your shoulder width (not in the middle) with fingers down.
After you enter, rotate your elbow up, which allows for immediate hinge. You must be able to get early the vertical water column.

Maintain integrity of your paddle (fingertips to elbow). Do not bend at the wrist.

The CATCH: corrective Drills:
Alternating hinge:
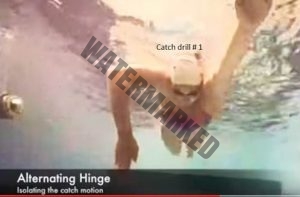
This is isolating the catch motion. In this you do one hand at a time. Alternate with Right and Left hand. (e.g. with left hand parallel to the water in front, you just do the catch practice with the right hand till you reach 90 degrees to the body. Kicking is just to stay afloat).
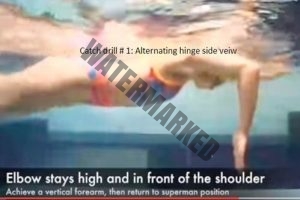
Achieve a vertical forearm till fingers directed at the bottom of the pool and then return to the superman position. Elbows stay high and in front of the shoulder. Repeat with each hand.
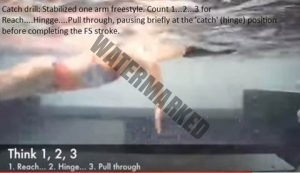
The CATCH: corrective Drills:
Stabilized one arm freestyle:
With one hand on a kick board to help stabilize the body, pull with the other arm pausing in the catch position.

Feel the hinge motion and then feel your paddle press back into the water.

In short: reach forward on the surface…hinge the elbow….pull through the rest of the stroke and finish it.
The CATCH: corrective Drills:
Catch up with pause: Beginning to use both arms.
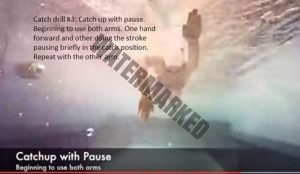
Both hands start in superman, and then one arm completes one full stroke, with a pause in the catch position, before returning to superman. Then the other arm begins to pull. This allows you to focus on one arm at a time and feel supported while working on finding the high elbow catch. Remember the 3 objectives of catch while pausing in the catch position.
The CATCH: corrective Drills:
Hold the bottom of the paddle:
Here you actually use a paddle in your hands. Instead of using the finger strap, hold on to the bottom of the paddle and do the entire stroke. Focus on your forearm being the centre of your paddle.
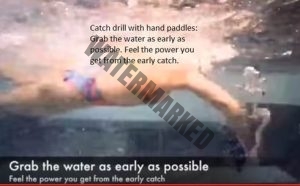
Grab the water as early as possible. Feel the power you get from the early catch. Instead of using a strap to keep your paddle on, try grabbing the bottom of the paddle so that you can focus on pressing into the water with your forearm and not just your hand. Swim regular freestyle or try any of the drills listed above with this bottom paddle grip to emphasize the importance of a vertical forearm in the high elbow catch.
The correct CATCH technique:

As arm drives in to the water, it should really reach forward. As the hand enters the water, make sure to get a full extension before you begin to plough. As you grab the water you should be able to get your elbow up and send the water back really early.
 Published on Feb 17, 2016
Rotation Overview: Ideal rotation is about 25-35 degrees. Anything more is over rotation.
Over rotation and its disadvantages:

Rotation all the way to other side is a huge over-rotation. It takes lot of your time and ends up having lot of imbalances in your stroke. You tend to cross over to the other parts of your body.
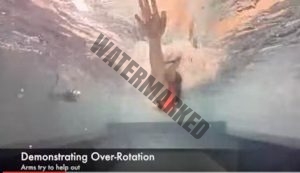
Your arms cross over underneath your body.

Another thing that happens is your feet start to hit each other as they cross over to aid in rotation.
Ideal rotation is about 25-35 degrees.

It is not about rotating a lot; it is about control, connection and power of the rotation to the arm pull. You have to control your rotation from your core, and when you take a breath, you have to ensure that you do not over rotate all the way to the other side. The breath is the most challenging part of the strong rotation, so really focus on that part.
Rotation – Corrective progressive drills:

- Rotisserie Drill: Just like a rotisserie chicken you want to rotate around your central axis. Maintain a streamlined position and kick as you use your core to control your rotation. Control is the real key word here, as you want to go nice and slow and control your rotation around your central axis.
Rotation – Corrective progressive drills:
Prone Kick with Rotation:

Kicking with your arms down your sides and rotating slightly to each side. Here focus on a strong and steady head, controlling your rotation and not going all the way onto the other side while maintaining that kick.
- Hip Connector Drill:

Adding in the catch and connecting it to your rotation. I call it as a hip connector drill because you want to pretend like there is a rubber band attached to your fingertips and to your hip and they are strapped to each other as they rotate together. This is great drill to work on your rotation and connect it with the arm pull.
Rotation – Corrective progressive drills:
Stabilized One Arm Freestyle:
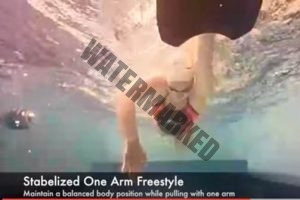
Maintain a balanced body position while pulling with one arm. I place my hand on top of a kick board while moving through the motions of one single arm pull. This prepares you for the next drill.
Single Arm Freestyle:
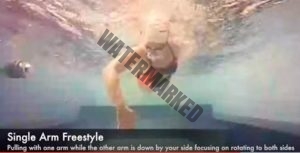
Pulling with one arm while the other arm is down by your side, focusing on controlling rotation to both sides even though you are pulling only with one arm. Now that we focused on control, we can begin to add power to in our rotation…next
Rotation – Corrective progressive drills:
Power Rotation with Kick-board:

Place a kick-board between your legs (knees) and add the resistance, which allows you to feel how that power translates in to your stroke.
7.Full Freestyle Swim:

Now that we completed the drill progression, you can begin to do full freestyle swimming focusing on control, balance and power behind rotation.
KICKING: https://www.youtube.com/watch?v=rRsF6HN8kmk
Published on Dec 1, 2015. 2-time Olympian in both open water and pool, Chloe Sutton, demonstrates kicking technique and rhythm for distance freestyle races.
Overview: In longer races like triathlon you want to save your legs while having an efficient kick and be as fast as possible. There as 2 aspects in kicking: Technique and Rhythm
Technique: Is very similar to walking. You do not want to bend your knees much more than walking and you not want your hip to be any bigger than when you are walking. You want your kick to come from your hip and you want it to be like a whip traveling down your legs.
- A great way to start working on your kick is by kicking on your stomach (with hands alongside the hips).

I recommend using a Snorkel so you do not have to turn your head to breath. From the side you can see size of my kicks as well as how I straighten my legs and lift it to anchor.

Full extension before lifting to anchor is important to getting power.
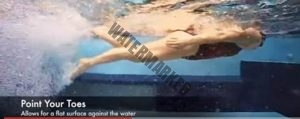
Ankle flexibility is also important to get a good toe point and a flat surface to push against the water.
Kicking technique continued..
- Next step is Adding in a rotation:

Using a strong core to maintain control, slightly rotate your hips and your shoulders while maintaining the same consistent kick making sure kick is all the way through and right on the surface.
Now after you master the rotation, proper kicking technique can transfer naturally to full swimming stroke to keep you balanced, connected and swimming fast.
KICKING – Rhythm: Two regular types of rhythms.

2 beat kick (1 kick per stroke or 2 kicks per stroke cycle):
Opposite leg kicks down when opposite arm enters. Use this when you want to conserve your legs in triathlon.
2.
6 beat kick (3 kick per stroke or 6 kicks per stroke cycle). You can say Strawberry blueberry which is bit slower instead of 1 2 3, 1 2 3 which is bit fast. More kicking allows more propulsion but it also expends more energy. You have to find what is the trade off is and find what works well for you.
Using both in a race can allow conserve your energy in the middle and surge at the end.
BREATHING: https://www.youtube.com/watch?v=XN7jvcoKQZ8
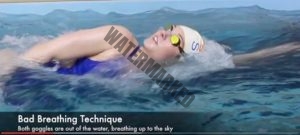
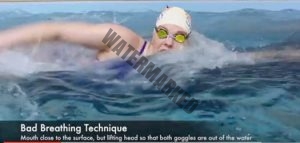
Technique: – “One goggle in and one goggle out”.

Breathing Overview: “One goggle in and one goggle out” is the key to the good breathing technique. You keep your head nice and low and turn your head with ‘one goggle in and one goggle out’ to breathe and put it back down.
Common mistakes and bad breathing examples:
- Both goggles are out of the water and breathing towards the sky.
- Mouth close to the water but lifting head so that both goggles are out of water.
- Lifting head to anticipate the breath.

Good breathing technique: Head stays down and in line with my body the time with one goggle in and one goggle out.
Breathing Corrective drills:
- Kick And Breathe:
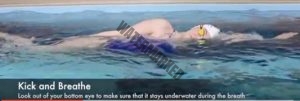
Simply kick on your side with one arm up and one arm down and making sure that you keep one goggle in by looking out of your bottom eye to make sure that it stays under water during the breath. Blow bubbles on your face i.e. make sure that you exhale while your face is in the water so that you only have to inhale when you turn your head to breath.
- One Arm With Breath:

Next you can add in a single arm stroke. (Remember that the straight ahead arm is taking support from a kick-board and other arm doing the entire stroke while practicing breathing). Keep contact between your arm and head to keep your head low. Also look from the bottom underwater goggle to make sure that you are still seeing from under the water and not seeing out of the water.
- Swim With A Paddle On Your Head:

Swim with a paddle on your head. This allows you to check your technique. If you are breathing correctly, it will stay on. If you are moving your head too much, the paddle will fall off.
Timing of the breath:
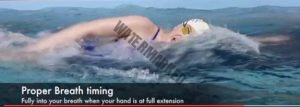
Timing of the breath is very challenging thing to work on. You should be fully into your breath when your hand is at full extension. Proper timing is like this.
After the other arm passes the shoulder on the recovery, that is when you start initiating the breath so as you begin rotation to other side, you should be turning your head and as soon as your recovering arm enters the water you should be fully in to the breath. Then you return your head before your body. This will allow you to either focus on the catch part of the stroke or the recovering arm. Remember if you see your recovering hand, you are late to initiate the breath and your breath is too slow. Common mistakes are:
- Initiating the breath properly but taking too long to breathe and turning head back with the body.
- A late breath is when your hand enters and then you turn your head to breathe. Then you are pressing in to the stroke with adverse effect on shoulder and big lateral muscles of the arm, which is to begin the catch.
So in a nutshell: you must begin to turn your head as the recovery arm passes your shoulder. Then as your arm gets a full extension you should be fully in to your breath. Finally return your head down before the arm comes in front of the face. Remember the head turns independently from the body. The breath should be done while your arm is in the catch phase of the stroke.
Corrective drills breathing:
- Quick Breath While Kicking:

This one is same as that we did for working out breathing technique but this time we are thinking of how about turning our head independent of the body. Lay on your side and practice taking quick breaths with head turning without body. Position- one hand in front (without support of the kick-board) and the other down by your side.
Corrective drills breathing:
- One Arm Freestyle:

Pull with one arm with your other arm is down by your side and breathe to the opposite side of the pulling arm. (Right arm is down and left arm is pulling and you have to breathe on the right side)
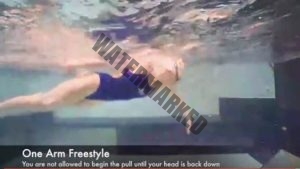
The rule here is you are not allowed to pull until your head is back down. (Note that the head is already down while the hand is pulling)
- Full Swim Quick Breath Hesitation:

Begin to add that quicker breath in to your full stroke but hesitate each time you take a breath. Again you are not allowed to pull back until your head returns to neutral.
Corrective drills breathing:
- Smooth It Out:

Finally after you have mastered these drills, you begin to make the quick breath a part of your normal freestyle stroke.
OPEN WATER SIGHTING TECHNIQUES: Chloe Sutton
http://www.chloesutton.com/swimming-technique-videos.html
Overview: The overall goal is to have quick sight, keeping your face as close to the water as possible and still see what you are looking for. You want to keep your hips as high near the surface as possible. You do not want your sight not to impede your stroke. You want to go as fast as possible without slowing down at all even though you still have to look around. Three possible ways of sighting and you have to find what works best for you:
- Simple Sight:
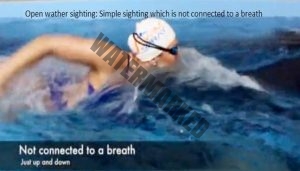
Simply lift your head and quickly put it back down. This is not connected to a breath but just up and down. Keep kicking through the sight while maintaining a good body-line.
As the stroke keeps moving everything keeps moving well; your legs keep kicking, your arms are pulling, your body is rotating and the sight does not slow you down.
Open water sighting – Simple sight like Alligator eyes.

When you lift head up just the eyes come up like an alligator, mouth is still under water and you are not taking any breath here.
- Sight In To Breath:

This is sight and then breathe, a little bit easier way. You just lift you head to sight and then head turns to the side to take a breath. This allows you to get more air. You have to breathe little more often with this strategy that the simple sight.
Pushing head down to the side to breathe really keeps hips really high on the water and helps maintain good body line.
You need to focus quickly and make a the sight quick because you do not want to take bunch of the strokes with head lifted as this can put your body in wrong position to be able to swim as fast as you need to.
Open water sighting continued….
- Breathe In To Sight:

That is first breathe and then turn your head forwards to sight. Eyes follow your hand as you bring your hand forward to see what is in front of you. Lot of people like this technique and use it exclusively and feel really comfortable because it allows using the momentum of your hand and momentum in your recovery to get in to that sight. You can lift your face little bit higher sometimes but you have to still be careful about not letting you a perilous stroke and not let your head drop.
- JODIE SWALLOW: ITU Long Course World Triathlon Champion -2009:
If you have found that you swim considerably better in the pool than in open water, you must have a look at this video:
https://www.youtube.com/watch?v=hiNkAMU8syI
Overview: Jodie’s FS stroke is not the conventional super smooth stroke. The stroke is hurried or little bit choppy or punchy but has an incredibly fast turnover averaging about 90 strokes per minute.

She uses the classic high elbow catch as shown in the picture here.

She has beautiful purchase on water (by slightly bending at the wrist) and lovely flow in rhythm, avoiding over reaching and over gliding in the front end of the stroke.
- IF YOU HAVE DIFFICULTY IN BREATHING IN OPEN WATER:
Learn bilateral breathing: In open water swimming the waves do not come from both sides at the same time. So if you have learnt bilateral breathing, you have the option to breathe on either side depending on waves.Breathe more often than necessary (e.g. if you normally breathe every 3 or 4 strokes, breathe every 2 strokes instead). In that case if you miss a breath you still have enough reserve to breathe on the other side without starving your brain of oxygen.
- FREESTYLE: STABLE HEAD SNORKEL:

https://www.youtube.com/watch?v=TDlVb2bgcjo
STABLE HEAD SNORKEL Overview: Using the snorkel helps keep the head stable in freestyle.
Using the snorkel: Why do it? The head leads the way, and it’s a great indicator of how you’re applying your energy in swimming. Put on the snorkel and swim freestyle. Focus on keeping the head as stable as possible. While looking from deck, at certain angles, it looks amazing. This swimmer is focusing as much as possible and doing a great job. However, when we look underwater, we see we still have a few things to work on. Finding just the right rhythm, the right extension and rotation, the right hand placement, to make sure the head is absolutely stable and moving forward is a search that isn’t all that simple. Too little power, head is stable but you’re not connecting to the water as much. Too much extension and you may introduce incorrect lines under. Trying to apply too much power and you may be pushing DOWN into the water rather than sending everything forward. Creating a great freestyle takes time, effort and a lot of thought. Using a snorkel can allow you to take a step back and focus on exactly what you’re head is doing as you swim. Keep it stable. This swimmer is on his way for sure!
- HOW TO STOP YOUR LEGS FROM SINKING?
https://www.youtube.com/watch?v=w7ETlhaMsEk
Why legs sink in water? Causes and remedies:
- Lifting your head to breathe.
: You have to breathe from side and not lift forehead above the water.
- Pressing down on the water in entry and catch.
: Avoid dropped elbow position and push water back and not down
- If you are holding your breath which can cause buoyancy in your torso and lungs.
: Exhale fully under water and inhale outside.
- Poor posture and bad connection through your core.
: Swim tall with chest out, shoulders back; draw your belly button into your spine.
- If you are looking forward.
: Look down in to the water about 45 degrees forward or little further and not straight down.
- Kicking from the knees like a bicycle kicks and if you have tight ankles.
: Kick from the hips with ankles extended and feet pointing back at the end of the pool.
- TOTAL IMMERSION: TI is a swimming technique and coaching methodology developed by Terry Laughlin.
The TI swimming technique focuses on 3 skills; balance, streamline and propulsion and creates an integrated whole body movement.
In contrast traditional swimming focuses on 2 independent techniques; kicking and pulling with focus on increasing strength during workouts.
TI however focuses on quality of movement and mindfulness with no compromise on speed.
The TI methodology is based on continuous improvement – Kaizen.
Each aspect from the stroke has been analyzed, while processes have been developed to work on each aspect in isolation without losing the focus on the whole body movement. This leads to rapid improvement in non swimmers as well as experienced athletes.
Here are some videos which would give you an idea of what TI is:
- https://www.youtube.com/watch?v=rJpFVvho0o4
- https://www.youtube.com/watch?v=_FrSTJLN_CY
- https://www.youtube.com/watch?v=tFmnJnmahLw
Terry Laughlin’s videos (2009)): Total Immersion Perpetual Motion Freestyle: Part 1 to Part 6:
- Part 1 https://www.youtube.com/watch?v=97b6XIntfcc
- Part 2 https://www.youtube.com/watch?v=l8YDoF-9juo
- Part 3 https://www.youtube.com/watch?v=ol-Wm5DTOTY
- Part 4 https://www.youtube.com/watch?v=TnrSr9tYCko
- Part 5 https://www.youtube.com/watch?v=JRg34sKcadE
- Part 6 https://www.youtube.com/watch?v=46GghWnOKYA
Online videos sometimes may give the wrong perception.
The TI videos are designed as demonstration and in order to show all aspects of the stroke the swimmers swim with a very slow tempo deliberately which accentuate the patient leading arm.
PERSONAL COMMUNICATIONS: In this section you will find tips and pearls of wisdom from various friends including few recreational triathletes, a swimming coach, a long distance swimmer, a running coach, a multiple super randonneur & an international swimmer, a Comrades finisher, an Everest summiteer, a runner who was a body builder, a long distance swimmer, multiple Ironman finishers including who recently qualified for Kona etc.
I firmly believe that every person, small or big, has something to offer from his vast knowledge and it is up to us how we use that knowledge to overcome our deficiencies and improve further.
While collecting tips from friends, I have kept triathletes as my main target audience. Right from those who want to learn swimming to those who have done Olympic tri and are now aspiring for half or full Ironman. I have tried to include every possible tip that I thought would be useful for triathletes to prepare properly for an event.
My basic idea is to let people know what things these experts (in their respective fields) have done for their achievements, the efforts that they have put in, the mental and physical preparation that they have done, the meticulous logistical and financial planning that they have done, the nutrition plan that they have followed, so on and so forth. Readers are requested to take whatever is applicable to them and improve further.
ZARIR BALIWALLA: He was taught swimming approximately 45+ years ago, by an excellent coach Mr. Patade (he is still alive)! In those days most coaches taught only breast stroke, so that’s what he learnt. Freestyle he picked up on his own in college days, watching others. Started swimming for fitness 12 -15 years ago. Found breast stroke too slow and boring. Moved to Free, but couldn’t do more than 200m without getting very tired. So he used to do combination of BS and FS up to 1500m taking a break of 10 secs every 300m or so. Slowly he reduced that breaks and BS. Now he can comfortably do up to 3k continuous Freestyle. His largest continuous swim has been 3.8k free style once – full 1M distance. Has done a 2K Swimathon in the sea as well, very different experience.
Swim goggles: Good brands are Speedo, Srena, TVR, Finnis, Zoggs, and Tabata. A lot of good Japanese brands also, but not in India.
Technical tips from too many persons could prove confusing to a novice swimmer. At the outset let us remember that Pool swim and Open water swim are very different. The tips listed below are for Pool and often irrelevant for OPEN WATER. Also the tips are specific for beginner / novice swimmer wanting to do a TRI, not for someone wanting to be a top pool swimmer.
Freestyle swimming: (Zarir Baliwalla)
- Easy Freestyle swim has 3 components basically – in order of importance: BREATHING, PULLING, KICKING and of course putting all 3 together!
- As a beginner don’t hesitate to breathe every single stroke. If you can, do BILATERAL BREATHING (both sides). While bringing your head out of the water, it should be sideways AND slightly tilted backwards as though you are looking at your shoulder. While breathing out in the water head should be straight but looking slightly forward in the water – not fully down. To get your breathing correct, it would be best to take a few one on one session with a coach.
- PULLING. Long, easy strokes with high arm elbow action are my preferred choice. You may do the S pull or the STRAIGHT pull; whichever you find easier. Both are well depicted on numerous YouTube videos.
- KICKING. Your kick should be from the hips. The ripples your kick creates should be akin to boiling water, not heavy splashing. Once again, see YouTube videos. People tend to kick real hard as they feel it helps their buoyancy and propels them forward faster. To me, this is a NO–NO for a real triathlete. You will get your legs real tired doing this and you actually want fresh legs for the bike and run! So, it’s Ok for a triathlete to have an easy gentle kick and focus more on correct breathing and a strong PULL.
- Try and be as COMPACT a swimmer as possible. A SILENT swimmer will always be more efficient than one who thrashes around /splashes a lot.
- Focus not on a fast swim but an easy one which can get you to T1 (Transition) feeling fresh. If your fastest 1.5K swim (which leaves you dead) takes 35 minutes, it’s OK to target around 37 minutes in the TRI; so that you don’t spend all your energy in the swim and are fresh for the bike sector.
- Swimming involves patience and persistence. The more you practice, the easier it will get.
- How many lengths can you do nonstop? Do those many lengths only for several days in a row. Don’t increase distance nor try to go faster. After a week or so you will find that distance much easier than when you started doing it. Then increase the distance by 10% and so on. DON’T focus on speed increase. That will automatically happen with practice and once the breathing- pulling- kicking ALL come together.
- I feel a good coach is very important. Self taught Freestyle like me will always have flaws in technique which are very difficult to overcome in later years. For example, I just cannot do bilateral breathing and my right pull is far stronger than my left!
Total immersion (TI) freestyle Vs Traditional freestyle:
- TI method is supposedly based on efficiency rather than strength. They say that using their method you will swim longer AND get less tired, without compromising on speed! TI focuses on BALANCE, STREAMLINE, and PROPULSION to create an integrated whole body movement.
- Traditional swimming stresses on 2 independent techniques. Kicking and pulling, with focus on strength during workouts.
MANOJ ERANDE:-
Manoj is a renowned swimming coach since many decades. He is Shri Chatrapati awardee (Dadoji Konddeo) for coaching 2007-2008. He has swum the English Channel in 1989. He currently coaches the national swimmers. Following are excerpts (from our personal meeting) addressed mainly to those wannabe Triathletes who want to learn freestyle (FS) swimming. The emphasis is on clear understanding of the concepts in freestyle swimming, without the use of complicated terminology.
General recommendations:
- Body flexibility and stretching exercises are more important as they help in proper roll (rotation), reach (extension) etc. A stiff body is more prone to develop cramps.
- Swimming is the weakest part among the Triathletes unless the Triathlete is primarily is a swimmer. Freestyle stroke is the fastest stroke; hence a Triathlete must make all the efforts to master it. Our aim should not be to just survive the swim but to finish swim as strong as possible.
- Body roll (rotation) is very important in FS. Proper rotation is when the front arm and both shoulders come in one line. It allows shoulders to become narrow in water thereby decreasing the water resistance. Body roll should be till the waistline.
- After the entry in the water and catch, you need to bend the elbow till the hand comes under the chin.
- When the hand pulls in the water, one can generate more power only when the elbow is bent. More importantly elbow bend prevents injury. High elbow after recovery with elbow bend position after catch enables us to engage the bigger shoulder and lateral muscles which makes pull to become stronger. Aim is to push water back and not down or sideways.
- Timing of head coming out of water to breathe is most critical. Improper timing is the most common mistake people make. Ideally when the pulling arm comes under the chin position the head should be out till the arm passes over the waistline and when the hand is going forward (for the entry in the water) the head should be going down. Head should be high and dry.
- Rolling causes imbalance. Kicking is partly to balance the upper body and partly for propulsion.
- During open water triathlon, he recommends not to panic, not to be afraid of depth of water, not to go to the sides of the lake as lake weeds may accidentally touch you making you panic (occasionally weeds can entangle you) and not to drink water.
- Generally 4 days in a week should be devoted for swimming if one wants to learn FS properly. Also once in 15 days one must try to swim in open water for 3-4 times if the forthcoming event is in the open water.
- Even in practice one must practice different strokes and not only FS. The idea is to break the monotony and to give rest to the FS group of muscles.
Common Mistakes:
- Entry across to the other side. The entry should be straight ahead at the shoulder width and not across to the other side. Also your fingertips should be facing downwards.
- Swim with straight elbow: High elbow position and bent elbow is very important for proper pull or the catch.
- Head not in water for more time.
- Take the head out wrongly.
- Bending in legs more: Bent knees do not propel efficiently. Kick from hips with straight legs. Kicking small and fast will make it easy to straighten your legs.
- Timing and coordination of hand movement.
- Head coming out at wrong time: Many swimmers start to breathe late after the stroke (i.e. after the hand exits the water). It then becomes difficult to balance and you may swallow the water. Breathe early: As soon as your hand enters the water for pull, start your breath. Remind yourself to turn the head with the stroke and not after.
- Looking forward: Looking forward drops your hips thereby increasing resistance. Always look at the bottom of the pool, relax your neck and see that your hips rise to surface.
- Swimming flat: Swimming flat can cause shoulder injuries including tendinitis and rotator cuff issues. Roll your body with each stroke.
Drills: The idea of drills is to get the individual component of freestyle right so that when you do the entire stroke, you do not have to worry about them. Drills can be done every day. Drills will improve your full Stroke. What you do for Drill, do same for Full Stroke Swim. The drills could be further divided into primary or corrective drills. While primary drills are basic ones, corrective drills are aimed towards correcting the smaller components of the freestyle stroke.
- Roll drills: One can do 3 strokes and then roll the body in the lateral position with one ear floating above the water (with one hand in front and other down along the side) and do 12 kicks. Remember the kicks are lateral kicks. Then do another 3 strokes, roll the body in other direction and again kick for 12 times. If you have done the drill right then when you do full FS swimming you will get proper roll position at every stroke.
- Superman drills:
- Kick with one hand in front and other near waist;
- Change hands and repeat.
- Keep both hands down near the waist and kick. Here there is tendency for legs to bend. Make sure you are not bending your legs.
- Fin drills: You can use flippers and then kick. This will allow you to confirm whether your kicking is correct at the same time it will help develop strength in legs.
- Catch up drills: This drill is to ensure that you are catching up water correctly.
- Touch freestyle drill: Here bring both hands in front above each other and touch…. count 1 2 3….the pulling hand bends the elbow…..continue through the pulling act…..breathe at the correct time…..bring again both hands in from and touch each other….repeat same with the other side. Remember to ensure that your head should come out to breathe when the pulling arm comes under the chin.
- Fist closed Freestyle: Do full FS swim about one length of your pool, say 25m, with fists closed. This will noticeably reduce the catch power and resultant propulsion.
- Fists open Freestyle: Do 25m regular FS swim. Compare with fist closed and fist open.
- Sculling drills: Kick with both hands extended in front….rotate your wrists inside and outside.
- Head in water: You can do sculling drill to practice FS breathing.
- Head up: You can do the sculling drill with head up where you breathe in the air.
- Gun point with breathing drills: Both hands together pointing like a gun. Here also you can do head up and head down drill while kicking.
- Drills with kickboard: Here you use kickboard for support while performing various drills.
- With one hand in front supporting the kickboard, the other arm does the entire stroke. Change the position and repeat.
- Same as above but add breathing practice. While the other arm is doing the entire stroke, practice taking head out to breathe and bring back down.
- Just breathing: With one hand in front supported by a kickboard and the other hand lying down along the waist, you just practice turning head out and in to simulate breathing.
- Place both hands over kickboard in front and kick. Mimic the ‘Milk boiling’ effect by kicking under the water.
- Drill with hand paddles: Use hands paddles and then perform the stroke. Hand Paddles are to be used if Under Pull Press is Correct and Elbow is Bending. Occasionally use of paddles can work as a corrective drill too.
- Drill with Pull Buoy: You can hold a pull buoy in between your legs and then just do freestyle stroke to improve your pulling.
MANDAR MAHAJAN: A derivatives trader by profession, Mandar although a long distance swimmer, is new to triathlon and running. He just did his 2nd Olympic distance triathlon this year. He participates in open water (sea) swimming races and has done 5k, 6k and one 10k swim. He believes in enjoying swimming rather than swimming fast.
He created http://swimbikerun.in/ a social networking site for Indian Triathletes.
He shares his thoughts & tips in swimming as well along distance swimming….in his words….
- Before going for an open water swimming, you should be comfortable treading water. If you are not comfortable doing it, see videos on YouTube to find out how to do it correctly.
- In swimming rhythm is very important. The biggest reason people unable to swim for long distance are they work too hard. If you want to improve your technique then slow down and see how you’re doing, feel what you’re doing, be relaxed, keep high body position.
- Chest hips and legs sitting near the surface along with good body rotation, reduce drag. I’ve seen people kicking unnecessary without proper timing wasting too much energy. Kicking without proper timing will slow you down instead of giving propulsion. For long distance swimming one should try two beat kick. In distance swimming, it is really important to save energy.
- Video analysis helps to quickly understand our flaws. If you have waterproof camera or mobile, tell someone to take your video. You’ll instantly know what’s going wrong.
- Visualization helps to learn things very fast. Try to imagine yourself swimming with the technique you want to implement in your swimming. Close your eyes and imagine you are swimming with the technique that you want to use in your next swim session.
- Timing is above everything. You may have a great kick, hand movement, but if the timing is wrong, it will not produce optimum result in terms of speed and efficiency. Your kick, your pull, push, recovery, your body rotation and breathing all has to be in sync. There is a Swimsmooth’s app “Mr. Smooth” which is very helpful to see every details of the stroke. You can check the kicking timing with hand entry or other body movement. Mr. Smooth uses six beat kick with high elbow recovery. Miss Swinger uses two beat kick with straighter arm recovery which most of the open water swimmers use. http://www.swimsmooth.com/mr-smooth-pro-console.php
- I think I should not go into stroke technique etc. because what works for one doesn’t necessarily work for others. There is so much content about that on Internet.
- SwimSmooth and Total Immersion are two giants in swimming coaching industry. There is always a debate about who is better, SwimSmooth Vs Total Immersion. I think as every swimmer is different in terms of his experience, body type and his goals, one should take best out of them both.
- Total Immersion (TI) is not a rocket science. They just give more importance to glide with two beat kick but it often leads to over-gliding and every beginner likes it. You can learn a lot from their videos. Give attention to every detail- their hand movement, body rotation, glide, two beat kick and try to implement it in your swimming. The Most Graceful Freestyle Swimming by Shinji Takeuchi :https://www.youtube.com/watch?v=rJpFVvho0o4
- To master freestyle swimming, first of all you need to be regular in swimming. Most importantly be relaxed, be flat on water and let it go easy. There is no hurry. If your goal is just to complete the swim, you can learn fast with TI. Your stroke will evolve over time. Develop your own style.
- You may find this blog helpful- ‘swimming in rough and choppy sea: breathing, sighting & stroke technique’. http://swimbikerun.in/blog/view/1575/swimming-in-rough-and-choppy-sea-breathing-sighting-stroke-technique
MIHIR SAMBHUS: A software engineer by profession, currently at San Jose California, has done 10 timed HMs (PB- 2.05hrs), 2 timed FMs (PB- 4.51Hrs), 1 ultra of 50k- 06:35hrs, a Super Randonneurs series in 2014-2015 and 2 half iron distance triathlons with breast stroke (Hyderabad: 8 hrs 35 minutes and Chennai, Mar-2016: 8hrs 58min). He was completely new to swimming when he started. He had a DNF at Goa tri in Feb. 2016. He shares his pearls of wisdom ….in his words…..
- In hindsight, here are a few lessons that I learnt: –
- Practice afternoon runs: In half ironman you start the run around 11 or noon. So either practice to run in that heat and sun or choose events with more forgiving climate and terrain. Heart palpitations and controlling body heat is a huge challenge. Should be able to complete a half marathon in max of 2:30 or 2:45 in the half ironman.
- Brick workouts do help: My legs neither felt like bricks nor did I get any cramps in the running portion.
- Optimize your transition times: I could have easily shaved off total 20 minutes from my 8:35hrs at Chennai if I had optimized transitions.
- Serious swimming practice is needed for any half ironman level event even if you are comfortable with the distance in the past. My swimming speed for breast stroke is optimized to 1 hr for 2 kms. Only way to improve swim speed further is focus on freestyle.
- Pay attention to details regarding the logistics. I had messed up the pre-race dinner, local transport and bike choice.
- Choose the rental bike properly if renting. Bad bike choice on a 90 km ride is a make or break deal.
- Don’t give up! Even though I felt like shit in the middle of the run, I was able to figure out a way and complete the event. In Chennai a bad fall at 2 km in the cycling leg almost ruined the event for me. But kept going with injured knee and ribs and completed.
- I am not ready for a full ironman. This event took all the physical and mental energy I had. I can possibly do a 3.8 km swim followed by 180 km cycling. But no way I can do a full marathon in 6 hours after the 2 events. Typical cutoffs for full ironman are 16 or 17 hours. And with my current half ironman timing I wouldn’t be able to meet that cutoff. I should be able to do a half ironman within 7:30 to 7:45 max in Indian climates to hope for a successful finish at an Ironman.
- To read Mihir’s blogs, do visit these:
- http://mihirsam.blogspot.in/2015/10/how-it-all-started-sometime-during-2014.html?m=1
- http://sportsjoy.in/mihir-sambhus-2/
PREETI KAMAT: She recently did 70.3 (Half Ironman) at Budapest 2016 in7hours 13mins. Here is an account from her husband. Those who are preparing for half iron distance triathlon can pick up important tips here.
- Preeti has always been a good swimmer. She had done triathlons- Olympic distance triathlon at Hyderabad and Baroda but never in open water. I gifted her Garmin 920 XT and I think the thought that someone (Coach Kaustubh Radkar) was monitoring her progress, drove her on.
- All the swimming was at the local pool and she managed 1hr swimming without getting tired.
- She tried the new Zoot wet suit at the 2 days open water training camp in Goa where coach Kaustubh studied the strokes of trainees in the pool and took them to the sea for open water training. She came back very much confident and in her words, her swim was sorted.
- We purchased a roadie with drop down handles for better speed. Our weekly cycle would be 25 kms and Sunday ride would be a long one, usually 50-70 kms. We had done a couple of brevets (200 kms) but never done cycling at the required speed of about 24-25 kms/hr.
- After buying a new set of carbon aero bars (Precision fitness) her speed was close to 25kms/hr after about 4 months of training. She learnt to get the wheel off, and change the tube, but I was still worried about her doing it on her own. I had a pump, but she would find it difficult to use a regular full sized pump, and there was no question of using a hand pump for a puncture.
- We learnt about the C02 cartridges, and we decided to invest in one after reaching Budapest.
- She had many half marathons and a full marathon behind her as far as running was concerned.
- On reaching Budapest: After carefully assembling the cycle, she did a practice swim in the Danube River and deposited the drop bags and the cycle at the venue.
- Race day: It was a wave start, meaning you stand as per your expected time in swimming. The eventual time is counted from the time on the chip. She lost few minutes as someone came into her timing chip’s Velcro strap.
- She had simple roadie. Most athletes have far superior bikes (carbon) especially for triathlons called tribikes. Riding two loops of 45kms each took her 3hours 39mins.
- Overtaking rules are strict, drafting is not allowed, penalties are given if you break rules.
- Time cutoff is same for men and women.
- After finishing the cycle lap, the cycle & helmet are placed at exactly the same place, or you get penalty points.
- Change (Transition 2) and then start running. It was very hot for Europe. Temp must have been 31degrees yet managed final time: 7hours 13mins. 13th in her category.
- Special thanks to Coach Kaustubh Radkar, whose Radstrong group and suggestions made a lot of difference in the result.
HARDIK D. PATIL: 28 yr old Ironman Hardik was a sport enthusiast since childhood. He was a body builder (2nd Mumbai university and 4th Jr. Maharashtrashree) before he started running actually to lose weight. He decided to do Ironman during his Pune Triathlon participation (3rd place -Novice distance Mar 2014) after meeting the chief guest Mr. Kaustubh Radkar.
Efforts taken and injuries incurred:
- Hardik’s maiden HM was in Feb 2014 (Surat) and his first Full Ironman in Nov. 2015 in 15:40Hrs (Arizona-USA). You won’t believe that during these 21 months he did 15 triathlons (5 half Ironman, 8 Olympic distance, 2 Novice distance), 27 half marathons and 2 full marathons.
- His second full Ironman came in March 2016 (15:20Hrs at Taupo-New Zealand) within 4 months of the first 140.6. Even during this period he did 1×70.3 and about 10-12 HMs.
- He was injured only twice and each injury cost him 4 months; first was a hamstring injury incurred during the first 70.3 (08:20hrs, Oct-2014) and the second injury was due to a fall from cycle a week after his 2nd 140.6 (New Zealand, March 2016).
- He has trained himself by watching YouTube Videos.
- In April-2015 he weighed 98Kg and so he was working out for 7-8 hours per day.
Turning point: After the first injury his family and friends suggested him not to cross his body limits. Feeling determined to prove them wrong he decided to take up this as a challenge and rest is history. He feels his participation in TCS Amsterdam & TCS New York Marathons gave him good preparation for the Ironman.
Lesson learnt (Hardik Patil): After the 1st IM, he attempted another full IM within a week and landed in to DNF due to bad cramps after 120k cycling. No amount of salt tablets would solve that. In that month he had done 2 FMs, 1×70.3 including the full IM. He feels you must allow adequate time for recovery if you are doing back to back big events. Lack of knowledge and no coaching were primarily responsible for this.
Triathlon Training:
- Swimming: – He was not good in swimming so he took help of his friend to improve strokes and breathing. He practiced in a lake. During an event he resorts to breast stroke (if FS was difficult due to currents) and still manages swim between 01:30hrs to 01:40hrs. He uses wet suit for the swim.
- Bike: – He prefers one piece suit for the bike, does ~ 60kms in 2-3 days. He used Cervelo P5 bike for 70.3 and 140.6 Ironman’s.
- Running: – He believes running regularly, does no drills, recommends ~10-15kms in 3 days. For bike & run he uses one piece tri-suit.
- Nutrition: – 2 days before race he used to have heavy Proteins & Carbs in every meals, 4 meals in a day, no fibres. Race day – GU Gels, Clif Protein bars. http://www.clifbar.com/products/builders/builders Liquid Amino, Hydro and Salt tablets. Before start of Swim- 2 slices of bread butter, 1 banana & 1 glass of Milk.
Take home message:
- Ironman is very hard event if you don’t follow proper practice & nutrition. However if both followed scientifically, then there is no way you can not finish.
- You need to develop physical strength as well as super mental strength to stay on a road on a race day.
- In his opinion, to finish IRONMAN successfully within the cut off time, you need to do swim in 2 hrs, bike in 8 hrs, marathon in 6.5 hrs and 2 Transitions 30mins each.
GEORGE ANAND:
Q: How to swim slowly in freestyle and improve freestyle?
Ans: I moved from 0m to 50m using TI (Total immersion) videos… It’s a slow process. Lots to unlearn as I learnt swimming a decade before so I had to learn from scratch….How to float? How to do bilateral breathing? It took 5-6 months to learn to float, breath and (2beat/3beat) kick without using hands…. then came bilateral breathing and last hand movement. …so it takes time to reach that stage. Don’t worry on mileage first….first learn to swim 25m properly…..my 2cent….
VENKATESH SUBRAMANI: An Indian and a software engineer by profession, fondly known as ‘Subbu’, actually made it to the podium of an Ironman race (Lake Placid) and qualified for Kona Ironman World Championship, with a time of 9:51:49, finishing 2nd in his age category and finishing 1st aka winning the marathon in his age group. His marathon time in Ironman made him qualify for the iconic Boston Marathon. He also won RAAM with Team of 8.
On my question (Ironman Triathletes – India group on Facebook on 21st June 2016) as to how to swim slowly in freestyle and that I have to stop after every 25m for catching my breath. He replied as under:
- Total Immersion videos and drills are good to follow.
- Few things I would like to mention here before you kick start, a) Based on what you said looks like you are holding breath, try relaxing, more you relax better you float and less you fight the water. b) Most beginner swimmers are very weak in kicking, therefore it is hard to perform drills easily, what I recommend here to buy a pair of FINs and start doing drills. c) what are the drills you have to focus as beginner: i) Floating – push from the wall float and relax ii) Side kick drills without arm extended, breath every 6 kicks, do one lap on left only and other lap right only, Also remember not to lift your head instead turn that creates a BOW wave in water to breath, Use FINS iii) Side Kick Drills with arm extended FINs both left and right.
- Remember to use FINS at-least you get comfortable in breathing. I recommend buying FINS, better to start with FINS because of weak Kick. Check this video and implement in the pool. https://www.youtube.com/watch?v=ngW0hGPU8wM
- Actually this is the best time to learn good technique, if you cultivate any bad habits now, you will impact your performance later, so I recommend starting slowly but good form. Do Drills with fins, and do lot of kicking drills too better now than later.
- The goal of the drill is balancing, beginners don’t kick well so don’t move well in water and end up spending more energy and giving up the balancing drills, having fins helps them preserve energy and move in the water at the same time implement drill exactly it suppose to be done. Using Fins also has other benefits improves ankle strength.
- I am not saying to use fins all the time, FINS psychologically helps beginners to get comfortable in water, that is how I learnt swimming first time I did in 2012. In my experience it never complicates, it builds confidence. Beginner’s biggest problem is not being confident in water and relaxing, having fins and pull buoy overcome this issue. So before we go to real swim for beginners it is good to break that problem and FINS is my solution.
- Good luck and Have fun! Last but not least, try to feel the water and relax, more you relax in water better you will feel, also you will enjoy a lot.
- I think number of days and months totally depends on individual, more persistent you are sooner you get there; yes it is slow process but not that it takes 6 months. Some people I know get it even under 2 months that is because they swim twice a day and almost every day. If you are already into endurance sports, you will be able to swim 500meter or even 1000meter in 6 months.
Venkatesh Subramani on ‘Training and Racing’:
- Training is a big part of any racing, even if not for racing, training is still important.
- For me it’s my joy and my freedom away from monotonous stress life.
- Technically I put emphasis more on training than racing itself because training is everyday thing, and racing is only one day.
- As much as I like workouts and training, I also learnt to respect my body. There is always time and place to push your limits. So putting training in systematic pattern (which I call STRUCTURED TRAINING) helped me build fitness and addressed few limitations as well.
- Yes defining training is one thing and staying motivated is other thing. Best way to stay motivated is define short-term goals and practical goals. These are real resources to achieve big goals. Dreaming high is good, but defining more short terms goals are healthy and very helpful to fulfill them.
- I truly believe in “You must learn to crawl before you can walk“
Venkatesh Subramani on ‘Depression and Anxiety’:
- At some point we all go through it, it is a human’s nature. I really don’t know what goes inside the body when I am training, I always found my energy level is high or happy, something I accomplished after my training.
- Since I started weight loss program in 2004, Running is my first venture in endurance sports.
- Honestly there was never a dull moment since I started it. I am really happy I started running. Running is now my new meditation and relaxing sport.
- I don’t do a lot of running now since I have to combine all three sports but if you ask me some day where I want to devote all my time in sport, it will be running.
- For some people swimming might be their best sport and cycling for others. It is really not the matter of physical choice; it’s a mental choice as well. Choosing what you love and pursing it, is important than filling in other shoes. These choices will also become part of your life style.
- Important thing is grit and chasing your dreams.
- It is always good to compare yourself, what you are today and tomorrow. Everyone is different. You don’t have to compare to anyone.
Venkatesh Subramani on ‘Triathlon is new Life Style’:
- Since I started pursuing Triathlon since 2012 and when I was very very new for swim, I devoted all my time for swim.
- I was not pursuing races back then and just learning new stuff was a new challenge to me.
- As I already had endurance in sports, I was only pursing swim skills more than endurance.
- Now having gained more experience, I spend less time for it. However I still spend reasonable amount of time in swim compared to all three sports.
- Overall I spent 60% of time in Cycling, 20% in Swim and 20% in Run. Again these timings change as per the season. Winter I spend a lot of time on Swim, Bike and as season kicks off, I do quite a bit of run too.
- But I do at least 3 times each activity every week.
ANIRBAN MUKHERJEE: an experienced swimmer, runner and a Triathlete who is doing his 70.3 Half Ironman at Vichy, France on this 27th Aug. 2016 gives herewith his tips of race day nutrition as well as how to prepare from half marathon to full marathon in 5 months.
RACE DAY NUTRITION for 70.3:
Most important points:
- No solid food during the race. Banana is ok. Gels mostly.
- Water per hour – No more than 800 ml of fluids. Even for a hot day.
- Electrolytes (Salt) per hour – At least 350mg/hour of electrolytes on the bike and run, especially in the heat.
- Carbs per hour – 60 (250 calories) to 90g(350 calories) of carbs max per hour. No more.
Ingredients:
- Banana has 100 calories or 27g of carbs.
- GU Gel Rocktane has 100 calories or 21g carbs (of which 6 grams sugar), 180 mg Electrolytes.
- Rrunn has 956 mg of electrolytes per capsule.
- Coke has 20 grams of carb or sugar in 100 ml. So in 500 ml it has 100 mg of carbs. Plus caffeine.
- One bread plus butter plus jam has 27g carbs plus electrolytes.
Step by Step Plan:
- 4 AM to 6 AM – Once – One banana, 2 pieces of bread butter jam and 250 ml of water.
- 6:30 AM – One GU gel Rocktane + 100 ml water if needed.
- 7:00 AM – Swim start.
- 7:35 AM – One Banana in T1 – + 250 ml water if needed or less water.
- From 8 AM to 10:30 AM – Every 30 minutes – one GU gel Rocktane (6 total) and 150 ml of water (or less) and 100 ml of coke.
- 11 AM – One Banana in T2 plus 100 ml of coke or water.
- From 11:30 to 1 PM – Every 30 minutes – 1 GU Gel Rocktane (Total 4) + 150 ml of water or 100 ml of coke. Rrunn salt tab only if needed. If you feel any tingle or cramp.
- Post Run: If possible then Milk + Turmeric. Econorm – Probiotic. Semi solid food or liquid food – Rice, curd. No protein, no fiber no fat. Icing at the end.
- One day later: Check for GI Distress signs and change accordingly. Eat normally. Bread, Butter, Jam – 2 Protein shake.
5 MONTHS PLAN TO GET FROM 21K TO 42K (by Anirban Mukherjee): Assuming you have comfortably run a 21K (or more) before and your 42k is 5 to 6 months away here is how you can plan your progression.
- Your Sunday long run is your marathon practice. Everything else is a support activity.
- Nutrition – Running long in like driving long – you need fuel. More carbs to take you longer, more protein to fix damaged muscles, more water to keep your body temperature low, more electrolytes (SALT) so that everything keeps functioning well. Vitamin D supplements, Vitamin B12 supplements, Fish Oil supplement, Turmeric, Ginger, Garlic!
- Leg strength day is to make sure you don’t get injured. Don’t miss it. Body forgets easily so two sessions a week is needed. You can also mix it with a small run day or have its own day. Cycling hills or even cycling alone is leg strength but not for all muscles that are needed in running.
- Speed sessions are important because they will make you an efficient runner and point out any issues quickly in the form of an injury.
- Hill sessions are important because they will exercise your heart and lungs the most and make your oxygen processing efficient.
- Rest days – Before your long run not after!. After is recovery run.
- Optional points: 1. Two sessions a day – whoever can do, it will teach your body that it must recover faster. Don’t try to get to it soon but remember why it’s important. If you tell your body that you are needed again in 8 hours, it will try its best to get ready!!! 2. Cycling, Swimming, Yoga, Walking – To increase your running stamina you can choose to cycle for longer than 2.5 hours and you will have an impact on running. If you swim, you lungs and heart health will get better for running.
- Muscle endurance Vs Muscle Strength – In the gym for any exercise, if you can do 16-18-20 reps then you are building muscle endurance (red muscle fiber). This will help you do better in your marathon. If the weight is so much that you can only do 4-5-6 reps then you are building muscle strength (white muscle fiber). This will help you to remain injury free.
- Plyometric – It’s important because many muscles like your calves need extra strength. Very few gyms have that equipment to make them strong. So the alternate is to do this which will make your calves and other muscles stronger.
- Chief Coach – You are your own chief coach because you need to balance training, family, partying etc. Everything else is a guideline. You will need to tweak the plan to fit into your schedule.
- Does it feel like work? – If yes then you may be training too much or not eating well or not resting enough. It’s not supposed to feel like that. Review your training plan. Review your nutrition.
- Foam Rolling / Massage – Sometimes no amount of stretching is going to relax and recover your muscles. You need to do foam rolling and get a massage.
- Recovery – Are you fully recovered before your next session? If not, add carbs, protein, salt, water, foam rolling, massage and believe it or not, twice a day sessions to see yourself recover faster than before.
- Don’t combine weight loss with marathon training – if you do, then you may end up getting injured. Marathon training requires massive amounts of fuel. You may overeat and gain a little weight but if you combine your weight loss goal with marathon training you will end up getting injured.
- Discipline – The more disciplined you are the easier is the execution of this plan! However humans are not robots. It’s ok to skip sessions but then don’t try to double down on the next session to cover up. It’s not going to happen and you may injure yourself.
- Optimal time for marathon training – It’s like figuring out how to climb that peak – should you climb from the steeper side or the easier side? Depends on your fitness level. This is six months plan. You may need 4 months. Some others may need 12 months!
- Listening to your body – You must learn to distinguish between normal aches and pains and injuries. If the pain has not gone away after two to three days rest or you always get a pain at a particular spot, you need to research on it.
- Post your marathon – Don’t become a fat pig by eating as much and not running as much. Portion control post your marathon is a must! Don’t become a marathoner with a paunch!!!
- Building in slack – Fitness should be a way of life and not a onetime marathon thing. After a marathon you don’t need to do an ultra! It’s ok to do a 5K or a 10K. You need to build in slack into your schedule so that it does become a way of life and does not become monotonous. One week (9 days including weekends on both sides) is a good slack every three months. Rest day is good in a week.
ANUJ KARKARE: He is currently in France and is doing 70.3 on 27th Aug 2016 at Vichy, France. His suggestions on triathlon gears, Transition from breast stroke to freestyle and how to pack for a triathlon:
Triathlon gears:
- 2XU, Orca and Zoot in particular are the famous and good brands.
- Position of the zip: Back or front zip. Back zip ones are a bit difficult to put on and remove. I would recommend going for the front zip one. In the front-zip ones, they have an option for full zip or half zip. I would recommend a half-zip as they have a better fit and are pretty snug. Importance of zip position is also because if you feel like peeing during an event, it is much easier to take it partly off with the front-zip one.
- Pockets: most suits have 2-3 pockets to keep gels and bars. Some suits don’t so try to avoid those. These pockets are usually smaller than the usual cycling jersey pockets and are designed to just store gels and bars and not mobile phone.
- Colours: while it may not be important for everyone, each company has its styling and colours. Some people (like me) like to have their whole kit colour coordinated (bike, shoes, helmet, tri-suit). So choose one which matches your kit if it matters to you.
- Fit: The fit of most tri-suits is pretty similar on these companies. The quality is also very good so you won’t need to worry about that. But you have to be careful in picking the size. These are meant to be skin tight- almost like a second skin to your body. A bit loose and you’ll have unnecessary folds and air drag. A bit tight and it’ll be uncomfortable.
- Each website will have an extensive size-guide to help you choose. They have measurements for height, waist, chest, etc. So measure yourself accurately and choose the one, which suits you best!
- Price: These are quite expensive (100€ -150€). They also have different products. More expensive ones typically have a better-fit, more breathable material, etc. 2XU has a ‘clearance section’ on its website where they sell the previous season’s leftover stock at around 40%-50% discount. I’ll check if Orca and Zoot have something similar.
- Online sports retailers like wiggle.com keep having sales and have few products on discount all the time.
- Another thing in swimming goggles is the size. I wear contact lenses and can’t afford to get water in the goggles while swimming. I tried 5 different goggles from different companies, but still water kept seeping in, however tight I made them. I realized that all of them are just too big for me (I am pretty small). So I bought a goggle from the kids section in Decathlon and I’m having zero problems after that. But during a triathlon no time to put on lenses during the transition, so I swim with my contacts on. And I found a Nabaji goggle in Decathlon in Kids section which is perfect for me. Worked well for all previous triathlons. No problems now.
Transition from breaststroke to freestyle: (Anuj Karkare)
- I was also not good in freestyle but I was forced to concentrate on front crawl and master it only after I registered for half ironman.
- I think the most important thing is being regular (going to the pool 2-3 times a week). Our body learns and optimizes the stroke naturally if it is subjected to repeated training.
- Also in each session, especially in swimming, there is a tendency of the body to stop for rest for a breath and we don’t really give our 100% every time (there is a subconscious fear of drowning or swallowing water or going out of breath). Our body can actually go beyond that. So if you feel breathless after a lap of 25m and your body is telling you to stop, give it a little push mentally and continue for another 5-10m or more.
- Imagine there is a shark behind you, you have no choice but to keep going and in that situation you’ll actually be able to go a long way, so why not during practice? Similarly if you feel like stopping after 100m, do another 25m.
Triathlon Event Packing List: Anuj Karkare gives how to get super organized with packing for 3 different sports. Excerpts below:
More details at: http://triathlonindia.org/triathlon-event-packing-list/
- Pre-race: Clothes, chargers, toilet kit, medical kit, food, cardboard box, multi tool kit, spanner and tape for your bike, pack a lock for lockers and a bicycle lock as well.
- Registration: swimming certificate, triathlon license (if you have it), and your passport for international events.
- Pre-swim: Pre-race nutrition and hydration, body-glide and plastic bags for getting into the wetsuit, Tri-suit, Wetsuit, Swimming Cap, Goggles, GPS watch and Timing chip and any emergency contingency .e. contact lens, extra tri-suit.
- Transition 1: Towel (to drying and changing since nudity isn’t permitted), cycling shoes (and socks if you prefer & pre-attach shoes on the bike to save time), helmet, goggles, gloves, bib, cycling clothes, nutrition to eat and drink during the transition and also to carry with you on the bike. On the bike are your puncture repair kit (two spare tubes, two tire levers, a multi-tool and a small pump), lights (if needed), water bottles, energy gels/bars taped or in a pouch near the handle bar, GPS cyclo-comp (optional). As for emergency, a pair of spectacles, contact lenses, some Band-Aids.
- Transition 2: Socks, shoes, cap, nutrition as usual and knee brace for any knee issues.
- Post race: Mobile phone to check your timings, dig deep into stats, click pictures and show off on Facebook! Good to have your own recovery bar and drink ready which suits you. A change of clothes, jacket, flip-flops completes this list for race-day!
- How to pack: Lay down all items category wise in different groups, with a stuff-sack for each group. Mentally imagine yourself on race-day and go over the events on that day chronologically – ticking off every item in your mind after seeing it. Imagine yourself arriving at the race venue, unpacking the things. Then before the swim you will need the body glide, wet-suit and so on. This will also help you prepare for the event and transitions as well. Everything should fit in a 40-50L sack.
ATUL GODBOLE: Motiv8 Coaching (www.motiv8coaching.com). FM-PB 3:15hrs (Bengaluru Marathon 2015), HM-PB 1:28hrs (ADHM2015), qualified for the USA Triathlon National Championships 2015, 6th in Open category (Goa Triathlon Feb 2016), Completed Comrades Marathon 2016 and also done 200, 300 and 400 BRMs. His 2 cents in his words:
Many have given inputs on technique, so I will focus on a different aspect.
- Doing short frequent sessions is much better to doing long infrequent ones.
- Swimming 3-4 times per week will give more dividends than 1-2 per week.
- Very important component is specific muscle endurance (upper body). We stand, walk, run on our legs since childhood, but do not do anything remotely taxing on the muscles of the upper body. Bitter truth is that to develop swim specific muscle endurance and ability of those muscles to efficiently burn oxygen, fat and carbs when swimming.
- You must swim and swim and swim, and then swim some more. It’s a multi-year process.
- Between Total Immersion (TI) and Traditional freestyle, the difference in my opinion: TI emphasizes balance, glide and streamlining while the traditional freestyle emphasizes propulsion and high turnover. That is not to say that both are mutually exclusive, just that both have different emphasis! TI is good for beginners to get their body position correct but after that one should focus on propulsion and turnover.
- I asked some insightful questions to Venkatesh Subramani about his training regimen and philosophy. Read full interview here. https://www.motiv8coaching.com/interview_with_subramani_venkatesh_indias_first_kona_qualifier_hero_of_ironman.html
- Race Report of my participation in Auburn Triathlon in California, 2015: https://www.motiv8coaching.com/auburn_triathlon_race_report.html
- My take on athletes asking me “whether to copy someone who is doing back to back 21k on weekends”: Yes, I and the other Motiv8 athletes training for Comrades did a lot of such back to back 21K runs, but it was always a tight rope managing fatigue and keeping injuries at bay. I would not do such runs nor prescribe them to athletes unless absolutely necessary and always after looking at the whole picture as it applies to the specific athlete and his/her circumstances. One can do this with proper guidance/plan, enough progression and patience, not just because someone else is doing it.
Read full article “The copy-cat syndrome’ here: https://www.motiv8coaching.com/copy_cat_syndrome.html
KRISHNA SIROTHIA: – Comrade Finisher on barefoot –10:57Hrs (May-2016), PB – HM – 01:32Hrs (Delhi, Nov-2015), PB – FM – 03:40Hrs (SCMM-2016), shares his running tips for Triathletes to improve their running performance.
Athletic background – 37 yr old Krishna (IT Professional) was into sports since his childhood (football and cricket; football-intercollegiate state level). Unable to get a lean and fit body from gym workouts, he took up to running in July 2013 and he has never looked back since. He is running throughout the year and fast improving. First HM – 02:15hrs (Hyderabad, Aug-2014). Within 4 months he did Goa HM-01:45hrs Dec-2014 after which he started running barefoot. First FM – 04:27hrs (SCMM-2015)
His weekly schedule –
(Krishna Sirothia’s weekly schedule)
- He runs 3-4 days in a week, depending upon what he is preparing for. For HM, 3 days/week are enough and for FM 4 days. 1 day for rest (zero activity).
- Rest of the days he does cross training and strengthening workouts in gym (target more on lower body and core muscles).
- During the week- one day tempo run, one day easy run and Sundays long runs. For a FM, he runs on both Saturday and Sunday rather than doing one very long run on Sunday.
- On easy run days, he mixes his running with strengthening depending on the schedule and time.
- Weekly mileage should be around 35-40 km for a HM and around 45-60 km for FM. Pace and all again depends on the individual and the target time.
- He follows his coach’s advice and the plan religiously.
Train smart –
- Usually people don’t train smart and follow others blindly. We need to analyze our body; our strengths and we need to chalk out our plans with the proper guidance.
- Running less but with a proper plan and a goal is more beneficial than running hard but without any goals or thought process.
- This helps you to remain injury free and will help you in getting the maximum performance from your body during the race.
- We should first concentrate on building endurance and strength and then comes the speed.
His Nutrition (Krishna Sirothia) –
- He is a pure vegetarian and follows normal diet with lots of fruits, vegetables and homemade food with less oil and spices.
- He avoids fried food. During evenings, instead of eating an unhealthy food, he would rather eat a banana or two.
- To complete his protein requirements, he eats Paneer, Tofu & Soya and takes whey protein during his long or hard tempo runs.
VENUGOPAL PANDYLA: A finance professional good at reading numbers, a runner and a passionate athlete, Venugopal was in to body building in his early days with 2nd position in Mister University (Nagpur) in 1988. Running: PB – HM: 01:51hrs (TGS Moveit April 2016) and FM: 04:49 hrs (SCMM 2016); Duathlon: 3rd position (10k run-40k cycle-5 k run-03: 16hrs) organized by Athletic initiative @Blueridge.
It would be interesting to know his daily routine to understand how he can maintain a well built physique, with only natural sources of protein and without going to a gym.
He shares his secrets…in his words…:
- I believe in a well-built physique as status symbol. Because it reflects you worked hard for it, no money can buy it. You cannot inherit it, cannot hold on to it without constant work. It shows your dedication, discipline, patience that’s why it’s attractive to me.
- My stint of 3.5 years has been injury free and I firmly believe in natural diet.
- There is one difference in bodybuilding and athletics what I learnt. In bodybuilding the real endurance and shape up of muscles start once you exhaust and then start doing. It means ‘No pain no gain’. It’s exactly opposite in case of athletic area. In pain you cannot perform and recovery is needed to excel.
- My day starts at 5.15 a.m. 250 ml of warm water. Nature call + brushing followed with warm up and ensures equal exhale pressures from both the nostrils.
- Stretches, Squats, Lunges, Crunches, Push-ups (moderate on days of running, Cycling and extensive on strength Training day)
- Tea, Banana (1 1/2 big or 2 Small) + 5 soaked Almonds then for run or biking.
- Stretches (after run or biking) light and slow, Push-ups to relieve muscle stiffness followed with 250 ml water (requisite hydration usually Gatorade during run/biking)
- 1 scoop Oat mix with equal amount of water + Milk heating in microwave until become paste. Add Cornflakes and 5 dates. Mix properly and consume in warm state (breakfast) at 8.30am. In a week, banana will be replaced with sprouts at breakfast.
- 200ml water every 2 hours. Fruits at 11am.
- 12.30 Or 1 p.m. Lunch: 2 Chapathis, 1 small bowl Rice, Turdal mix, Chas and any vegetable curry (less spicy). Weekly thrice 2 egg whites and at that time no rice.
- 4pm fruits (at office).
- 6 or 7pm vegetable juice at home.
- 8.30pm – dinner: 2 Chapati and Chas. No Tea or junk food outside or at office.
- Note: Sometimes quantity varies; ensuring satisfaction ‘feel full’ is vital and doesn’t mean overeating. Quantity of water varies with season; still minimum 4 liters a day. 15 mins foot massages on Advent Massage/Vibrator (after run or biking and after coming office) helps me to relieve 100% stress in body. This is my regular routine which I try my best to follow.
- For stretches I use rope-based equipment with step.
- For complete upper body workout I heavily depend on pushups while squats and lunges for the lower body. My workouts don’t involve gym equipment.
- I only use body weight and my diet is 100% natural.
- For running sometimes I have used Unived and Fast & Up products and found them beneficial.
SANJAY KARANDIKAR: A Shivchatrapati awardee, Sanjay has been a bronze medalist (water polo) in Asian games (New Delhi 1982). He was captain of Maharashtra state water polo team from 1985 to 1998 and during his tenure his team always got either gold or silver medal. He is in to cycling since 2007.
A 5 times Super Randonneur (SR) + 1000brm in 2013-14 and 2 times SR + a 1000brm, Sanjay is the best person for tips on cycling and swimming. Here he shares his observations….in his words…..
Those days:
- My daily schedule in the swimming camp those days, used to consist of 5-7km swimming along with drills and then the actual water polo practice.
- During Asian games the workout was 15-17km swimming daily which is probably equivalent to doing a full marathon daily.
Cycling:
- Inherent strength matters a lot in any sports.
- You have to find out what is your wattage output and monitor your heart rate.
- So far I have not taken any nutritional supplements except in BRM to prevent cramps.
- Earlier I never used to think about food planning before long ride but later I learnt that we must plan nutrition properly.
- Eat before you are hungry and drink before you are thirsty.
- If you are riding with a buddy, you must eat and drink as per your requirements and not your buddies.
- Endurance comes only after long rides.
- Long ride should be more than 2 hours or preferably more than 100kms. Only then you will realize your own needs, your comfort about saddle, short bike fit, finger numbness and shoulder discomfort so on and so forth.
- For long rides you have to take care of loss of electrolytes. Take Enerzal or ORS or similar.
- Each and every person’s salt requirement could be different. Know your own requirements.
- Before an event, if you want to do any major changes in your cycle; you must do 2 weeks before and not later. You may however do general cleaning or servicing close to the event.
- Last minute changing of brake pads can change your braking habit and you may fall due to too tight a brake.
- Even changes in seat height or handle bar can change your posture or position on the cycle which can matter in a very long ride.
- If you feel tired and want to stop for a while, in my opinion you should continue at a slower pace instead total stop. Total stop could result in waste of time. My best BRM timings have happened with this strategy. In Surat I required 13.5 hrs for a 300BRM which was on a flat route. The break up would be first 100km – 4 hrs, next 100km – 4.5 hrs and final 100km – 5 hrs. For a 200BRM in 9 hrs my first 100 would be in 4 hrs and next 100 in 5 hrs.
- Judge your own pace. If I feel tired, I immediately slow down. I do not use HR monitor but judge my tiredness from the heartbeats. How do I differentiate between tiredness due to energy deficit and heart getting tired? In case of nutritional deficit you get a different feeling, you see slightly blurred, your brain sharpness is bit dull, your thoughts get some lag and your reflexes become dull. In case of energy deficit do not continue, stop, eat and proceed.
- For my BRM nutrition I use baked whole potato applied with butter, dry fruits, chikki, banana and energy bars. I do not eat big meals (lunch or dinner) on the way but I make it a point to eat every hourly.
- If someone has acidity problem, it is prudent to anticipate it and take preventive measures before an event.
- Never pace a fellow cyclist unless you know him well. You may not be as trained as him and you may burn out early trying to match him.
- In BRM- first 100km everyone is about the same; between 100 and 200 the difference starts showing; between 200 and 300 gap becomes more and after 300 the difference between best and the rest is obvious.
- How do I keep my morale high?: Keep small distance targets instead of big ones and imagine only of that part. E.g. imagine that after xyz point I am going to experience a nice breeze or after pqr point there is a nice downhill so on and so forth.
- I never did any special practice for staying awake in nights during long BRMs.
- About Cadence: Each person has to find out his comfort level with high or low cadence. Walking with short steps is akin to high cadence and walking with long strides is akin to low cadence. About 60-90 cadence is ideal. Low cadence can cause muscle fatigue while high cadence can cause high heart rate. It is very difficult to get 80-90 cadence.
- Keep in mind that you could have deficiency of Vit B12, Calcium and Vit D3 etc. and address them properly.
Swimming:
- Proper breathing is the most crucial part. You must fully exhale in water and fully inhale outside.
- Kicking is used for balancing your body. However during the kicking drill just ensure that it is a propelling one.
- Kick drill and breathing drill can be done together with one hand supporting the kickboard.
- Overall position of the body: Chin is slightly up or forehead should be touching the water.
- During practice and also during events you must alternate between freestyle and breaststroke so that different muscle groups get activated and get rest too. One should not be bent on doing just freestyle.
- Catch: Technically speaking, if you are pushing water behind effectively, your hand goes in (for catch position) and comes out from the same position. In other words your body should go ahead that much.
- Mastery in swimming is possible only after tremendous practice. It should be a patient and long-term plan.
- If possible you can ask someone to video shoot your swimming technique to know if you are adopting a wrong technique. Of course there is no substitute to a good coach.
Triathlon:
- During training for a triathlon, I feel one must practice any 2 sports at a time instead of any one sport for long time. Idea is to get used to the transitions. One may combine Swimming and cycling or cycling and running.
- You need to develop 15hrs of endurance for an event like Ironman. So during the training you should be combining all the 3 sports together as much as you can. Here my preference would be in doing the total distance of swim and cycle and whatever possible of the run. For example if I am preparing for an Olympic Tri, I would do 1.5k swim followed by 40k cycling and whatever possible distance from the 21k depending upon other variables.
KISHOR DHANKUDE: A Mount Everest summiteer (25-5- 2014, from North Ridge Route, China side), Kishor is also a Comrades finisher (09:59hrs, 2016). His best HM time – 1:36hrs (2014 Pune International marathon) and best FM time is 03:54hrs (2016 SCMM). He has also participated in 2015 Deccan Cliffhanger cycling race as a team. Who else but Kishor on how to prepare mentally for a big event? He shares his approach…in his words….
- I set a target, which is achievable for me. Once I lock that target, then I dedicate my time and train accordingly.
- After that whatever Do’s & Don’ts and If’s and Buts’ are irrelevant. That’s how I prepare myself for any achievement.
- Training – For me it’s always about building up of body’s muscle memory, to adapt the conditions of the race day and to simulate the event. I firmly believe in it. Once it’s done then your body will do wonders.
- Mental Conditioning: This is the real hurdle for many and also for me in past but not anymore. Mental conditioning happens during training. During training I prepare my mind to cope up with all sorts of difficulties, which may occur during race. If something tries to pull me down, I ask myself only one question, “Why did you start when you had to quit and that too in the middle of the event?” and keep me reminding.
- I do set some short goals.
- I keep my morale high by enjoying the event, the surroundings and by interacting with people whenever possible.
- Everest, Comrades are extremely endurance events. People have died during these endeavours. I have no fear of dying in any event. Moreover I know I am not going to die as I have trained hard for the same, so nothing to worry.
- So running, cycling and swimming are the areas, which I’m concentrating.
- About Deccan Cliffhanger race: Route recce is very important. We did route survey two times before the race. This created route memory in our brain and we planned our race strategy accordingly.
- Swimming: I am currently learning freestyle stroke. Though learning freestyle is difficult but that’s how I train mentally. I don’t want to learn any other stroke, as I am not willing to do my first triathlon/ Ironman as my last. I am also practicing other strokes such as breaststroke and backstroke.